

DACC
Feature Car
May 2004
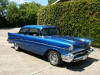
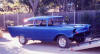
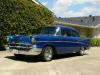
1957 210 Two Door Sedan
Larry and Jan Rollow
I still remember the day when my friend, who lived across the street, came home with the ‘57 Chevy he had just purchased and pulled in his driveway. I was in the front yard of my parents house washing my car. His car was a Bel Air two-door hardtop white over red, power pack, three-speed with overdrive. I was quite envious as I felt the ’57 was one of the coolest cars I had ever seen, and now he had one! I vowed right then and there that someday I would have a ’57 too. He and I are still good friends but his ‘57 is long gone.
This was the early sixties and I was in college and did not have much money. In fact, several opportunities came and went for me to purchase a ‘57, but I was never able to scrape up the necessary funds to make the purchase. The cars I was able to get (not all at once) consisted of two DeSotos, one Dodge, a 1951 Studebaker and, gasp!, a ‘57 Ford. All purchased for very little money and requiring some maintenance to keep them running. Upon graduation, I entered the Navy and, although I now had some money, I sort of went off in other directions car-wise, owning a Corvette, El Camino, several Corvairs and others.
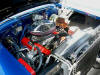
Fast forward to 1987, and one day at work I noticed an advertisement for a ’57 two door sedan, 210, V-8 with “three on the tree”. I went to look at the car and found it to be original, but in need of some serious restoration. My co-worker who owned the car had purchased it from the estate of the original owner. He had planned to re-do the car but illness forced the sale. I wrestled over purchasing the car as I had always wanted a Bel Air hardtop. But since the car was original, and although in need of repair, it ran and was all there. In fact, the car still did not have a radio in it! Since I rarely leave a car stock, I felt this car would be a good candidate for modification. Ever since I had my Corvette, I knew that if I ever did get a ’57 it would have a 350HP 327 engine in it along with a 4-speed.
So I purchased the car. Shortly after that, I joined CCCI and DACC. At the time I was already involved in a car restoration/modification so I knew that it would be some time before I got to the ’57. Little did I know how long it would really be. Life has a funny way of intervening in the best laid plans of man. A new house project, a divorce, trying to be a good Dad to my daughter and finishing the other car I was working on soon brought me to the late nineties. Some work had been done by then, such as pulling the original power train and selling it, a little body work and accumulating some of the many parts I would need to complete the car. I had also built the 327 engine I wanted using a block I purchased from a engine core source in south Dallas. I had also purchased a pair of double hump heads at a swap meet and had them reworked with larger valves and some pocket porting and short side radius work by Yelvi’s Porting service. I then had Kim Barr racing engines do the machine work, boring it .030 over and machining the heads to get the desired compression ratio I wanted, 9.75:1 (the original 350HP engine had a 11:1 compression ratio but this is not very streetable with today‘s gas). After getting all the parts back from Kim Barr’s, I assembled the engine, checking all clearances, cc’ing the heads and so on. I used a Edelbrock Performer RPM intake manifold along with a Holley 750 CFM carburetor. Since I was using an early 327 (small journal crank), it did not have provisions for new style positive crankcase ventilation. The Edelbrock manifold had a uncut blank for the early style oil input tube, so I had this bored out in order to use the tube. I used a Crane valve train consisting of a “blueprinted” replica of the “151” Chevy 350HP cam, 1.6 roller tip rockers, and hydraulic lifters. I know a much more powerful engine could have been built, but this was a nostalgia project for me, trying to build the car I wanted back when I first fell in love with ’57’s. However, as you will see, I made several concessions to modern technology.
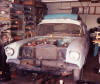
In the spring of 1999, I answered an ad in the paper for a guy who said he would do body work at your home. I hired him but soon realized that it was too good to be true. The work was slow and not that good and after paying him for the work done and for some work to be done, I did not see him again. Tough lesson. But the good thing that happened by this experience is that I finally got off my duff and made some decisions regarding exactly what I wanted to do with the car and what I wanted it to be.
Up to this point, I was unsure if I really wanted to do a body off restoration and just how far to go. I did not have a clue as to who to go to get the work I wanted done. So I went through the phone book and called every advertiser that said they did auto restorations. Only one or two called me back. One, Steve Crowley, seemed like a good guy and someone I could work with. So I looked over his shop and he looked over my car, and we discussed just what would be the best way to proceed on the project. I also called all the references he made available to me. He got glowing reviews, so I hired him. The car went to his shop and body was removed and installed on a body rotisserie. The frame was sandblasted and painted semi-flat black. Then the frame was delivered to my house for build-up.
During the “dormant period” of owing this car, there were a few periods that some work had been done as I previously mentioned. In one of those periods, I installed a 80’s Camaro ten bolt 3.42:1 ratio, positraction rear end. For those of you that have done that, you know it is not really that hard. The important things to remember are maintaining the proper pinion angle and getting the proper spacing side-to-side when welding on the new brackets. Also the ten bolt is ½ inch per side wider than the stock ’57 rear end. Since I wanted to use Corvette 8-inch rally wheels in the rear, that necessitated changing the back spacing on the wheels so they would fit in the wheel wells. I did this myself by cutting the welds with my cutting torch, moving the spacing to the correct position and then welding them back together. After I did all this work I found out there are several places that will make the wheels for you with any spacing you want. Oh well, live and learn.
Meanwhile back to the frame build-up. I rebuilt the front end using new bushings, ball joints, along with Mike McGouhey’s tubular upper A arms. These have more caster designed into them which is desirable when using a late model power steering. I installed disc brakes using CCCI brackets and the rest of the components I had accumulated. I used Monte Carlo 7-inch rally wheels on the front and they went on without modification. BFG tires were used both front and rear. I also re-installed the ten bolt using the original springs that I had rebuilt. I did not use the original front bushings for the leaf springs as I used Cal Tracs traction bars which use their own supplied bushing for the tractions bars. I used the brakes that came with the ten bolt (rebuilt of course) at the rear of the car. At this time I installed an after market anti-sway bar, but redesigned the brackets, as I wanted a better response from the bar. The front anti-sway bar would have to wait until the total weight of the car could be placed on the tires in order to get the proper placing of the brackets. So now the frame would roll!
Next came the power train, which consisted of the aforementioned 327 engine, a Lakewood bell housing and 4-speed transmission on the late style motor mounts I had put on the frame. The 605 power steering was installed and hooked up to the rebuilt tie rods and idler arm. The stock drive shaft needed to be shortened a bit and then was installed. I wanted a drive shaft retainer, so purchased a “universal” kit from Summit Racing and modified it to fit my application. My roots go back to drag racing, so even though I most likely will not race this car, I wanted to build it as such anyway. Next came the exhaust system. Along with the HPC coated headers, I purchased an aluminized dual exhaust system from CCCI. This required some modification to fit, mostly in hooking up the tail pipes to the collectors of the headers. A 3/8ths fuel line was installed along with an electric fuel pump to augment the stock pump when needed. The new tank (the original was too rusted) would be installed after the body was replaced on the frame. Since I was going to use a late model power booster with a dual master cylinder, I needed to run lines to each front brake and a single line for the rear brakes.
I have a replica Teardrop camping trailer, another nostalgia item from my youth, and since I wanted to be able to pull it with the ’57, I made a receiver-type trailer hitch. I figured it would never be easier than when the body was off, so the time was right. At this point, the frame was nearing completion. Meanwhile, Steve Crowley was making good progress with the body. I went through several iterations with regard to the color. I had always wanted blue, but which one? I strongly considered Harbor Blue, a factory color, but I was not able to come up with that exact color, plus it was not bright enough for what I wanted. I finally settled on a 1986 Camaro metallic blue. Steve did a great job applying it to the door jams, inside the trunk, while waiting for the body for final application. The body and frame were nearing the time when they would again be mated!
I wanted to do one more thing before the frame went back to Steve’s shop. I decided to run the engine. I wanted to do this for several reasons, not the least was I just wanted to hear it! So I jerry-rigged the radiator, and fired it up. To my great satisfaction it fired right away and ran fairly well. I soon discovered that the swap meet carburetor I had on it was no good. Even though I had rebuilt it, there were still some problems that I could not seem to diagnose and fix. So yet another phone call to Summit was made and several days later I had a new Holley. Now the engine ran like it was supposed to. I was ready to deliver the frame to Steve.
Body and frame were again back together, using, of course, new mounts. Steve reassembled front end sheet metal, installed the doors and so on, in preparation to apply the paint. After paint, color sanding and buffing, the car was finally ready to come home to my garage. Now the job of assembling the car fell to me. First the new front and rear windshields were installed. I hired this out, as I did not want to risk breaking them. Installing all the stainless steel trim, rechromed bumpers and all the other trim took a considerable amount of time, and unfortunately , a couple of scratches in the new paint.
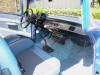
I had Ray’s Auto Trim install the reproduction Bel Air upholstery and headliner. After installing the side glass, I installed the door panels and arm rests. The carpet was the last piece of the interior to be installed. I decided on using Bel Air upholstery in the car, even though it is a 210 simply because I liked it better than the 210 stuff. I also installed the Bel Air dash trim but did not use any Bel Air trim on the outside of the car. In went the AM-FM cassette radio and the Air Products air conditioning system. I also installed a Sony CD player along with dual front and rear speakers.
The original wiring harness was cracked had been damaged in a few places, so I felt a new wiring harness was more than justified. The harness I got from CCCI fit well and allowed me to use a internally regulated alternator without any wiring modification. The bracket for the air conditioning compressor interfered with where the factory put the battery, so I moved it to the trunk. I used a Summit Racing re-location kit which came with a marine type battery box as well as cable and mounts. When moving the battery to the trunk, it is important to be sure there are good and plentiful grounds between the frame, body, engine and of course the battery. So far I have experienced no problems with the location of the battery to the trunk.
Putting the car back together proved to be more challenging then I thought. There are so many little things to be done, some of them have to be done in a specific order or you get to do it again! I learned this the hard way on several items. Installing the new window channels is not a job I particularly want to do again. Even though I had the benefit of the tech guide and the How to Restore a1957 Chevy book, many jobs are almost trial and error. I have rebuilt several cars before this project, and the experience was a help. I would recommend to anyone who contemplates this type of project to get as much reference material as possible and have access to some experts for additional help. I used the tech help line at CCCI many times and found them to be very helpful and knowledgeable.
The car was finally far enough along to again start the engine. Of course there were several leaks to contend with but most were easily repaired. The engine still ran great, but when I tried to drive it for the first time, I discovered that the “rebuilt” 4 speed I purchased several years before at a swap meet was anything but rebuilt. Let the buyer beware! So out it came and over to Standard Transmissions of Fort Worth. More money than I care to say later, the transmission was now truly rebuilt. Back in went the 4-speed and now I could really drive it for the first time. While the transmission now performed as it should, I was disappointed with the performance of the car. I thought it over and concluded that I had made some miscalculations in both the rear end ratio with regard to the ratios in this transmission and with the fact that by lowering the compression ratio of the engine with that cam, the bottom end power of the engine was less than I expected.
In a discussion with a friend who is in the transmission business, he suggested I look at the Tremec 5 speed for my application. The Tremec has a much lower first gear and also has an overdrive 5th gear. Another thing that was suggested was to advance the cam 4 degrees to pick up the bottom end power of the engine. I did that but was still unhappy with the performance. As it happens sometimes in life opportunities come along that are just what you need. A deal came my way for a Tremec 5 speed so I jumped on it and set about to install it in my car. The Tremec has a different spline for the clutch disc, so a new disc had to be installed along with the transmission. This also proved to be of benefit, as the disc I had originally installed was more of a racing disc and, as such, chattered for street driving. So I got a street disc this time and the results are much improved. The drive shaft had to be shortened again, as the Tremec is a bit longer than the Muncie. The shifter only required a slight moving and enlarging of the hole in the floor. I am now totally happy with the way the car drives. The performance is very good and being able to slide it into 5th (overdrive) really makes it a great cruiser down the freeway.
Back in October, when I first got the car running and it wasn’t quite finished, my wife and I took it to a cruise night in Plano. I won first in class and I was both surprised and pleased. All that work and I even got a trophy the first time out! As previously mentioned, I had been a member of DACC since 1987 but had not been very active. I had come to know several members, including David Graves. At this time, DACC was in the process of reorganizing and David and I began corresponding about the club and the upcoming Autorama. He wanted to put one car of each year in the show and my ’57 was selected as the representative of that year. We all had a great time and signed up some new members and talked to a number of prospective members. And, to top it all off, each member of DACC who had a car in the show; Steve Pratt; ’55, Kevin Brown; ’56 and me with my ’57, received trophies.
Believe it or not, there is quite a lot that I did to my car that is not related here. Yes, it was a lot of work, but it was all worth it to me. Each time I get a thumbs up driving down the road, or get some type of kudos at a car show, it makes it all worth it. My next undertaking with this car is the Hot Rod Magazine Power Tour. As you know, it starts in Arlington and ends up in Green Bay, WI. It’s been a much longer haul than I expected to achieve this car, but it is for me truly a dream fulfilled!


|
